
How to 10X Your Website Traffic with Pinterest!

Disclosure: This post contains affiliate links, meaning I get a commission if you make a purchase through my links, at no cost to you. However, I only recommend products I use and love.
True or false: Pinterest is just another social media platform.
If you answered true.. guess what!?You couldn’t be more wrong!
Pinterest is actually a powerful search engine (like Google!).. and while you’re busy pinning outfit ideas for your next vacation, gluten free dessert recipes, and DIY crafts for your kid’s birthday party.. your dream clients are trying to find you on the platform, with their credit cards ready… and they can’t, because (I bet) you’re using Pinterest ALL WRONG.
But don’t worry! I’m going to teach you exactly how to use Pinterest the right way, for your business. When used correctly, Pinterest is an incredibly powerful marketing tool that will help you 10x your web traffic and land quality leads, right to your inbox. In fact, I’ll show you the exact strategy I use to get over 1.5 million views every month to my Pinterest content.
Those 1.5 million views convert to tons of website traffic, and a whole lot more high quality design leads, many of which become paying clients. What kind of leads, you ask? I’m talking about my DREAM CLIENTS — female millennial entrepreneurs, across the United States, including restaurant owners and beauty industry professionals.. which are my favorite people to serve.
In fact, ALL BUT ONE of the new clients I’ve gotten this year have come directly from Pinterest.
Let’s talk numbers though, just in case you aren’t convinced yet.
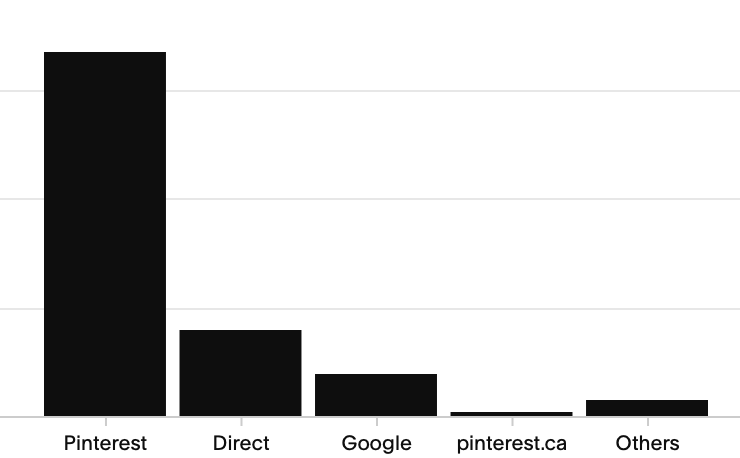
Last month, Pinterest was responsible for 71% of my website traffic. That is fucking huge! Instagram, by comparison only brought in 0.3%. (Not even 3%.. 0.3%.)
What a joke! Can you see now why I spend SO MUCH MORE TIME hanging out on Pinterest these days?
Let me guess. You’ve been been spending your time strategically planning a gorgeous Instagram grid, writing meaningful captions (including a call to action!), and trying to “beat the algorithm” with all the right hashtags and posting at exactly the right time of day.. but your sales and website traffic is stagnant AF? It’s the worst! Believe me, I was stuck there too.
Friend, let’s make a pact to stop wasting time, and head on over to Pinterest instead. Set up your business account now, and then implement everything I’m about to teach you.
I’m not only going to change the way you think about Pinterest, we’re going to transform your business together.
Are you ready?
Step 1: Understanding Pinterest, SEO & Keywords
The first thing you need to know is that Pinterest is a search engine, like Google. Even though it seems like a social media platform, Pinterest is not really social media.
Followers do not matter on Pinterest—impressions do. Pinterest defines impressions as “The number of times your Pins or ads were on screen.” This is what we care about. The more users see your pins, the more they will get saved, re-pinned, and clicked on — which is our goal.
Our #1 goal is for users to click on our pins, because that will take them to our website or blog.. where we can then point them in the direction of what we want them to do next. This could be making a purchase, signing up for our email list, reaching out via a contact form, booking a consultation, or something else.
Like other search engines, Pinterest runs on SEO. This means keywords are everything.
If you’re a rookie to world of SEO and digital marketing, here’s a few definitions for ya, to clarify things. I need for us to be on the same page!
terms to know
SEO stands for Search Engine Optimization and is the process used to optimize a website's technical configuration, content relevance and link popularity so its pages can become easily findable, more relevant and popular towards user search queries, and as a consequence, search engines rank them better. (Source)
Keywords are the words and phrases that people type into search engines to find what they're looking for. For example, if you were looking to buy a new jacket, you might type something like “mens leather jacket” into Google. Even though that phrase consists of more than one word, it's still a keyword. (Source)
We must include keywords in everything we do on Pinterest. I mean EVERYTHING. This includes what we name our files BEFORE we upload them, our pin titles, pin descriptions, and our Pinterest profile.
You shouldn’t have to think long and hard about what your keywords are. They are the words and phrases that describe your business, your services and products. You should also include your location in your list of core keywords, as well as a brief description of your dream client.
For example, my keywords are.. freelance brand strategy designer, branding studio, NYC, New York, branding, brand identity, Squarespace website design, graphic design, small business, wellness, skincare, entrepreneurship, beauty blog, female millennial entrepreneurs.
Pro tip: Once you’ve identified your list of key words, I recommend writing them on a post-it and keeping them in your workstation, so you can refer back to them often and every time you’re posting on Pinterest.
I will be teaching more on how to do keyword research for Pinterest in my in-depth Pinterest course later this year. Sign up for my email list so you’ll be notified when the course is available.
Don’t know who your dream client is? Read this blog post now.
Step 2: Optimize your Pinterest Profile
In this section I’ll teach you how to optimize your Pinterest Profile.
Include keywords in your Pinterest name (yes your NAME!), as well as in your profile description.
Here’s mine as an example.
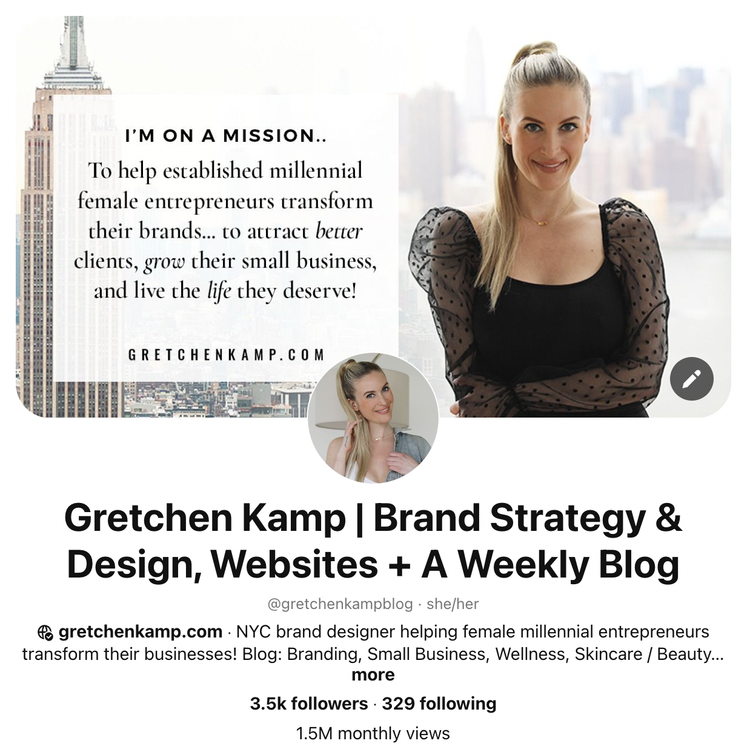
Pro tip: Make sure your profile picture is a bright, clear professional photo of your face, smiling. Use the same profile photo across all social media platforms (including Venmo if you use it for payment!) for instant recognition.
Include your email address and your website url in your profile description, so it’s easy for people to find your website and contact you if they want.
This is important! Include as many keywords as possible, but don’t “stuff” them. Write natural sentences that include the keywords, don’t just list them off. That is called keyword stuffing and it will work against your SEO.
For example:
Good: Hey, I’m Gretchen Kamp! I’m a NYC based brand strategist and designer, helping female millennial entrepreneurs transform their businesses. I also write a weekly blog on branding, small business, wellness, and skincare/beauty.
Bad: NYC brand strategy design female millennial entrepreneur branding small business wellness skincare beauty
Got it?
Once your profile is optimized with keywords and photos, it’s time to switch to a business account, claim your website, and install the Pinterest tag on your website. If that sentence just stressed you out or confused the living shit out of you, you’ll definitely want to sign up for my in-depth Pinterest training later this year. Take a second to add yourself to my email list so you’ll be notified when it becomes available. I will go through all of these steps in detail as part of the course, so you can’t screw it up.
Step 3: Set up Boards
In this step we are going to create boards, name them, and add descriptions. This is also where you have to unlearn everything you thought you knew about Pinterest, and start thinking of it from the point of view of your dream client.
Are you unsure of who your dream client is? Read this blog post now! ..and then come back on over here when you’re done. It’s super important that you know exactly who your dream client is, so that you can put yourself in their shoes when creating and pinning to your boards.
Put yourself in the shoes of your dream client. Are they wearing fun Nikes or red bottoms? Sorry, ADHD moment. But really.. close your eyes and pretend for a minute that you are this person. Think for a second about their interests, hobbies, their home life, their work life, their goals, their dreams, and how they spend their weekends.
Now, create PUBLIC (NOT secret) boards that will be valuable and attractive TO THEM. Take your own interests out of the equation for now. Name the boards with straightforward, to the point, keyword-infused titles. This is NOT the time to be cute or sassy.
Here are some examples of my board names:
Branding Tips for Small Business Owners
Small Business Ideas, Tips, Resources, & Quotes
Wellness, Self-Care & Mental Health
Skincare / Beauty for Millennial Women
Airbnb Ideas & Tips for Hosts
See how the names describe EXACTLY what the viewer can expect to find within the boards, and include keywords? This is what we want.
Here’s the scenario we want to create: your dream client comes across your profile, because she clicked on a pin she saw in her Home Feed. She sees your boards - all of which are topics she is into.. so now she’s even more interested in your profile. She clicks on a board, sees a pin you created that entices her.. clicks the pin.. now Voila - she lands on your website, where you can guide her to do whatever it may be you want her to do next. This is most likely going to be signing up for your email list, purchasing something, or contacting you.
Are you starting to see how this whole Pinterest-as-a-marketing tool strategy works!?
Yay! Let’s keep going…
Step 4: Create and post pins that link to your website or blog
This step is the bread and butter of how we’re going to use Pinterest to get users from the platform on to your website, so I hope you’re still paying attention!
I highly recommend using Canva to create your pins. If you don’t already have a Canva account, use this link to try Canva Pro for free.
The ideal pin size is 1500 pixels tall x 1000 pixels wide, however, square pins that are 1080 x 1080 tend to perform well too.
Canva is awesome because it’s super user-friendly for non-designers, and they have tons of beautiful templates.. so you can just swap out your text and images, download the image and you’re good to go!
I will dive much deeper into how to create pins using Canva, including how to create 25 Fresh pins for 1 piece of content.. in my in-depth Pinterest course, which will be available later on this year. Make sure to sign up for my email list to be notified when the course becomes available. If you think this blog post is valuable, you haven’t seen anything yet! I will be giving away ALL my secrets for how I get 1.5 million Pinterest views every single month - which convert to tons of website traffic and high-quality, high-paying dream clients.
But until then, let’s keep going..
This is super important: Your pins should link to specific pages on your website or blog.
For example, a pin that says “Why You Need Brand Photography” should link to a blog post with the same title, or something very similar. If your pins link to content that is irrelevant, it’s likely you will get flagged for spam which we DO NOT WANT. If that happens often your account will get shut down.
Not sure what to pin, or what type of pins to create? Here are some ideas!
If you have a product-based business, pin images of your products and have them link to the page where the user can purchase the item
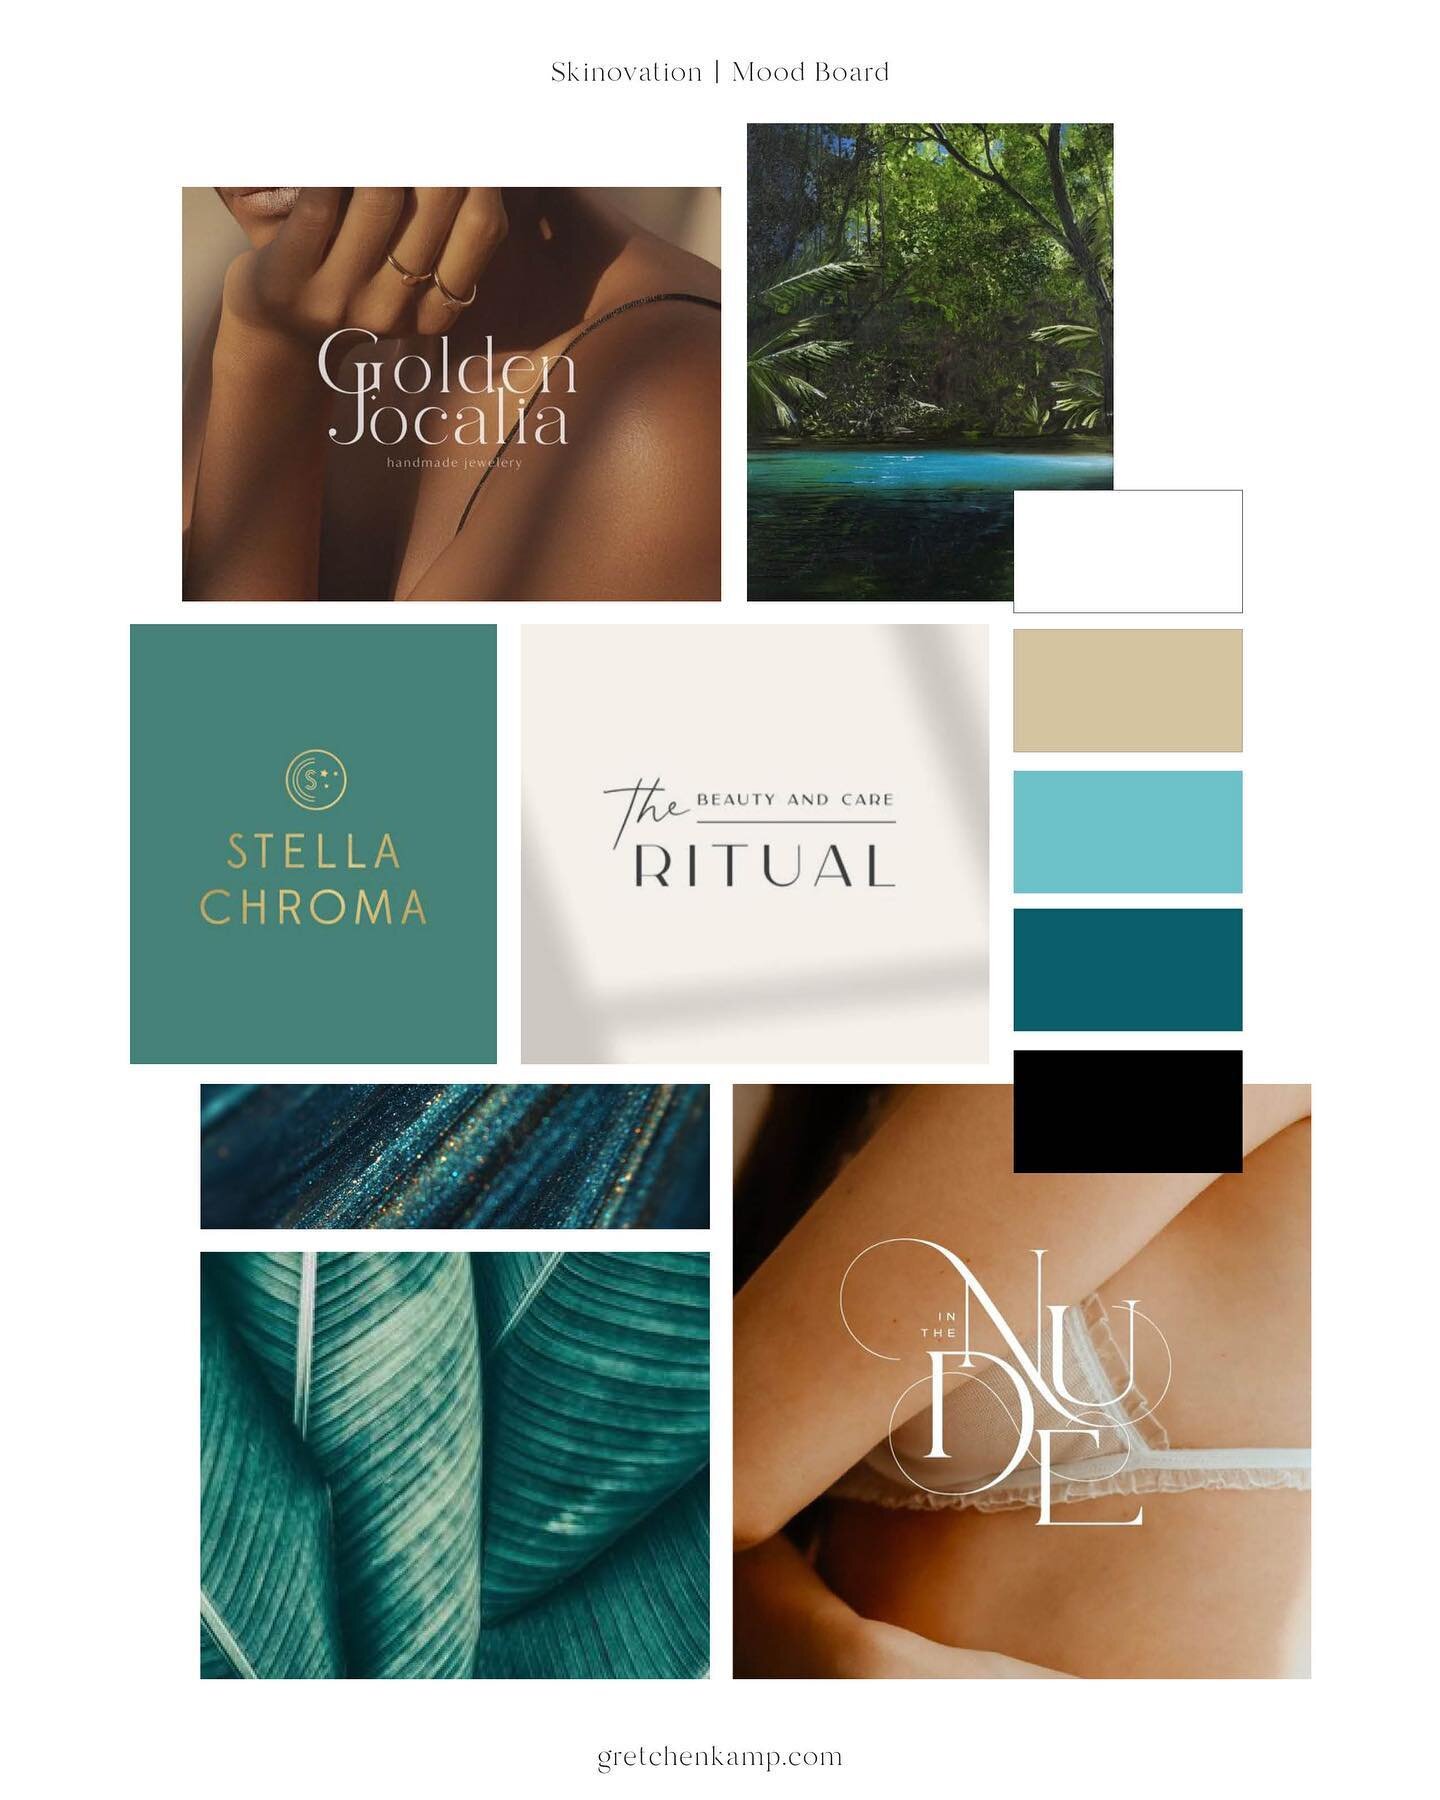
If you’re a creative professional, like a designer or photographer, pin images of your work that link to your portfolio
If you’re a blogger, or you have another type of service based business, your best approach is to create free high-value content (this blog post is a perfect example) and use Pinterest to drive traffic to that content. From there, make the most of your website traffic by capturing emails with a quiz or freebie, and start nurturing those relationships with email marketing. Since my design packages are high-ticket items, it is common for a lead to follow me for months before making a purchase, and that’s totally fine! Most people don’t drop $2800+ on a whim, like they might when buying a candle or bracelet.
A few things to consider..
SCHEDULING PINS
You can post in real time, but I recommend scheduling pins ahead of time. This way you can batch work, and schedule a whole week’s worth of pins in a single day. You can schedule pins on Pinterest without using a 3rd party vendor. On the Create a Pin page, at the bottom, instead of ‘Publish immediately,’ you can select ‘Publish at a later date.’
LIFESPAN OF PINS
Unlike posts on other social media sites, Pinterest pins are basically immortal. They could show up in a users feed weeks or even months after you originally post them if they're relevant to a user's search. According to WebpageFX, the half-life of a pin is around 3.5 months. (Source) I’ve had pins go viral literally years after I crated them. It’s crazy. And so awesome, compared to Instagram posts.. which essentially are rendered useless after a few hours or days.
PAID VS. ORGANIC PINS
You can wait for Pins to gain traction organically, but if you want them in front of a lot more eyes, a lot faster, you can pay to promote them.
GROUP BOARDS
I also want to mention here that it’s a great idea to start group boards and join other user’s group boards, and pin your content there, as well as to your own boards. I will dive further into group boards in my in-depth Pinterest course that will be available later this year.
Step 5: Pin High-Quality Content Besides Your Own
This is by far the easiest step, and in some ways the most fun. Also, you’re almost to the end so keep reading!
Remember how we created our boards with our dream clients in mind? Now it’s time to fill those boards with pins that link to content the dream client will find relevant and valuable. The concept is that your profile becomes like a scrap book of awesome content that the dream client will love - some of it is your content, and a lot of it is other people’s content. A smorgasbord, if you will.
This step is also important because Pinterest doesn’t like accounts that only pin their own content, because it comes off as spammy. You want to behave like a “normal Pinterest user,” not someone who is just using the platform to promote their own business (even though that is essentially what we’re doing.)
All the pins you save to your boards must link to high quality content. This will create trust and make your page an invaluable resource to those dream clients.
I have a great tip for this step! Regularly scroll through your Home Feed, which should already be full of relevant pins because of how your boards are named. Save pins that you think might be a good match for your boards to a SECRET folder called “Articles to read & pin later.” Then, when you have some free time, go that folder, click on a pin, read or skim the article. If it seems like quality content from a reliable source and something your dream client will find valuable, pin it to one of your public-facing boards. This is a great way to ensure everything on your boards is high quality. Keep in mind, it does us no good if our boards are full of pretty pins.. if they don’t lead to high value content, or worse, they’re spam.
That’s it for now!
I highly recommend checking out my Pinterest profile to see everything I’ve talked about in this blog post, in action.
I know this has been a lot of info, and there’s a whole lot more where that came from.. which I will share in my in-depth Pinterest course, later this year. Make sure you sign up for my email list to make sure you get notified as soon as the course becomes available.
I hope you implement this strategy and start seeing results in your business. The sooner you start, the sooner you’ll see results. Happy pinning!
x, gretchen
Are you sick to death of...
- Feeling like a hamster in a wheel, chasing the latest social media trends?
- Trying (unsuccessfully) to "beat the algorithm" so your social media posts get seen?
- Posting on social media regularly, but not seeing much engagement, or any real increase in profits?
- Knowing you have amazing services and/or products to offer, but struggling to be seen online and getting crickets when you do reach out?
Girl, we need to talk.
Chances are, there's a lot you're doing wrong. I know because I was stuck there for a long time, too. But don't worry, I'm here to help you!


Related Posts


Psst.. are you sick and tired of figuring out what to cook or order for dinner every night?
I was so over it. I tried Blue Apron and Hello Fresh, and I loved the convenience of the meal kits... but they were so expensive, I just couldn’t justify it. Then I found Dinnerly.
Click here to get a free box from Dinnerly - on me!
Dinnerly has allowed me to take the guess-work out of dinner completely, and quit grocery shopping — which felt like a huge waste of my precious time. But what really sold me on this particular brand is the price. I still can’t believe that Dinnerly meals are only $4.99 per person per meal, and they are literally the exact same thing as Blue Apron and Hello Fresh. (I’m talking the same exact chicken with the same packaging from the same vendor.)
I’ve been using the Dinnerly kits to make dinner for myself and Ham 3 nights a week for the last year, since we started living together. So I can vouch for them that the quality is consistent. In addition to being super affordable, they have so much variety and the meals are incredibly tasty. They have options for vegetarians, pescatarians, as well as low-calorie and low-carb. The meals are pretty healthy and balanced too — you know we eat clean and are a very health conscious couple. Plus you can make them a bit healthier depending on what type of oil you cook with, how much butter or ghee you use, and how much salt you use.
You know I don’t recommend any brands or products that I don’t absolutely love, and I recommend Dinnerly to all my friends.
I’m a Brand Designer and Strategist living in NYC. 9 years ago I quit my job to start this business, and now I’m here to help you do it too! I specialize in helping established female millennial entrepreneurs transform their brands.. to attract Dream Clients and grow their businesses, so that they can make more money, be their own bosses and live the life they deserve!