How to Grow Your Email List with a Quiz!

Disclosure: This post contains affiliate links, meaning I get a commission if you make a purchase through my links, at no cost to you. However, I only recommend products I use and love.
So… you’ve launched a beautiful website for your small business, complete with a Subscribe form. Awesome! Congrats! You’re ready to use email marketing to provide your audience with valuable content, and implement the ‘serve, serve, serve, sell’ strategy. Except… no ones subscribing. Not even one lousy cricket! Uh oh!
This is probably because your website is missing a lead magnet 🧲. In this blog post I’m going to teach you how to use Interact to create a Quiz as a powerful lead magnet, and install it on your website.
🧲 What’s a Lead Magnet?
Great question! A lead magnet is a marketing term for a free item or service that is given away for the purpose of gathering contact info. For example, lead magnets can be trial subscriptions, samples, e-books, and free consultations. However, my favorite lead magnet, hands down, is a Quiz!
A lead magnet is the fastest and easiest way to grow your email list. Period.
📧 Why Email Marketing?
Maybe you don’t have an email list, or you don’t think you need one because you’ve been growing a following on social media. Guess what… you still need an email list!
In fact, email marketing is actually a much more effective tool than social media. Let’s go over why your email list is SO important.
It allows you to build something that you own - unlike social platforms which are out of your control
It creates more intimate connections with your subscribers
It enables you to reach the right audience with the right offer at the right time
It helps you craft an experience and warm up an audience before leading them to a purchase
It’s SO MUCH EASIER to position yourself in front of your target audience by showing up in their inbox.. rather than *hoping* they’re scrolling social media.. and also *hoping* that the algorithm shows them your content. You know that only 6% of your instagram followers actually see your posts in their feed, right?
✏️ Why a Quiz?
Quizzes are fun! 🤸
A quiz only takes a minute or two of someone’s time ⏳
A quiz doesn’t require a download (which some people aren’t into, for fear of viruses or taking up space on their hard drive)
A quiz gets your audience excited about your products or services. For example, my Brand Style Quiz includes logos I’ve designed, to get my audience excited about the possibility of hiring me 🙋♀️ for their branding. That could take a lead from warm to hot! 🔥
Pssst… Are you struggling to stay organized, be productive, complete your to-do lists… or do you just feel unmotivated or even pessimistic throughout your workday? I have something for you, boo! Click here to snag your free copy of The Best Day Ever Worksheet
Why Interact?
Interact Quiz Builder makes it fun & easy to create your own quizzes and install them on your website, social media or blog
You can have more than one quiz at a time, to target different niches
You can start with one of Interact’s templates and tweak, or start from scratch
I am amazed by how many leads my Interact quizzes are collecting!
Ready to try Interact? Use this link to get started on Interact now
How to use Interact to add a quiz to your website:
Step 1: Build Your Quiz
Click here to visit Interact’s website and then click on Get Started for Free.
Create a free account and then click on the button that says ‘+ Create New Quiz’.
On the left hand side, you can sort by industry, and then on the right side you can either choose Start from Scratch, or scroll down to see their pre-made quizzes, from which you can choose one to use as a template.
Once you’re in the Quiz Builder editing area, it’s pretty self-explanatory. On the left side you’ll see a menu which drops down for you to edit your cover, quiz questions, and results. If you get stuck or confused, use the chat feature on the bottom right.
Use the quiz builder to create a quiz that will interest your niche. Remember, you will only get to collect their email address if they finish the quiz, so you don’t want to bore them by making it too long or uninteresting. The questions and answers should be light and fun, but also relevant to your products and/or services.
Pro Tip: Write the results first, then design questions that lead to those results.
If you’re confused by this, take my 2 minute skincare quiz and you’ll see what I mean. The questions are actually pulled from product descriptions. I chose 4 products I wanted to use for the results first, and then wrote the questions to correlate with the 4 results.
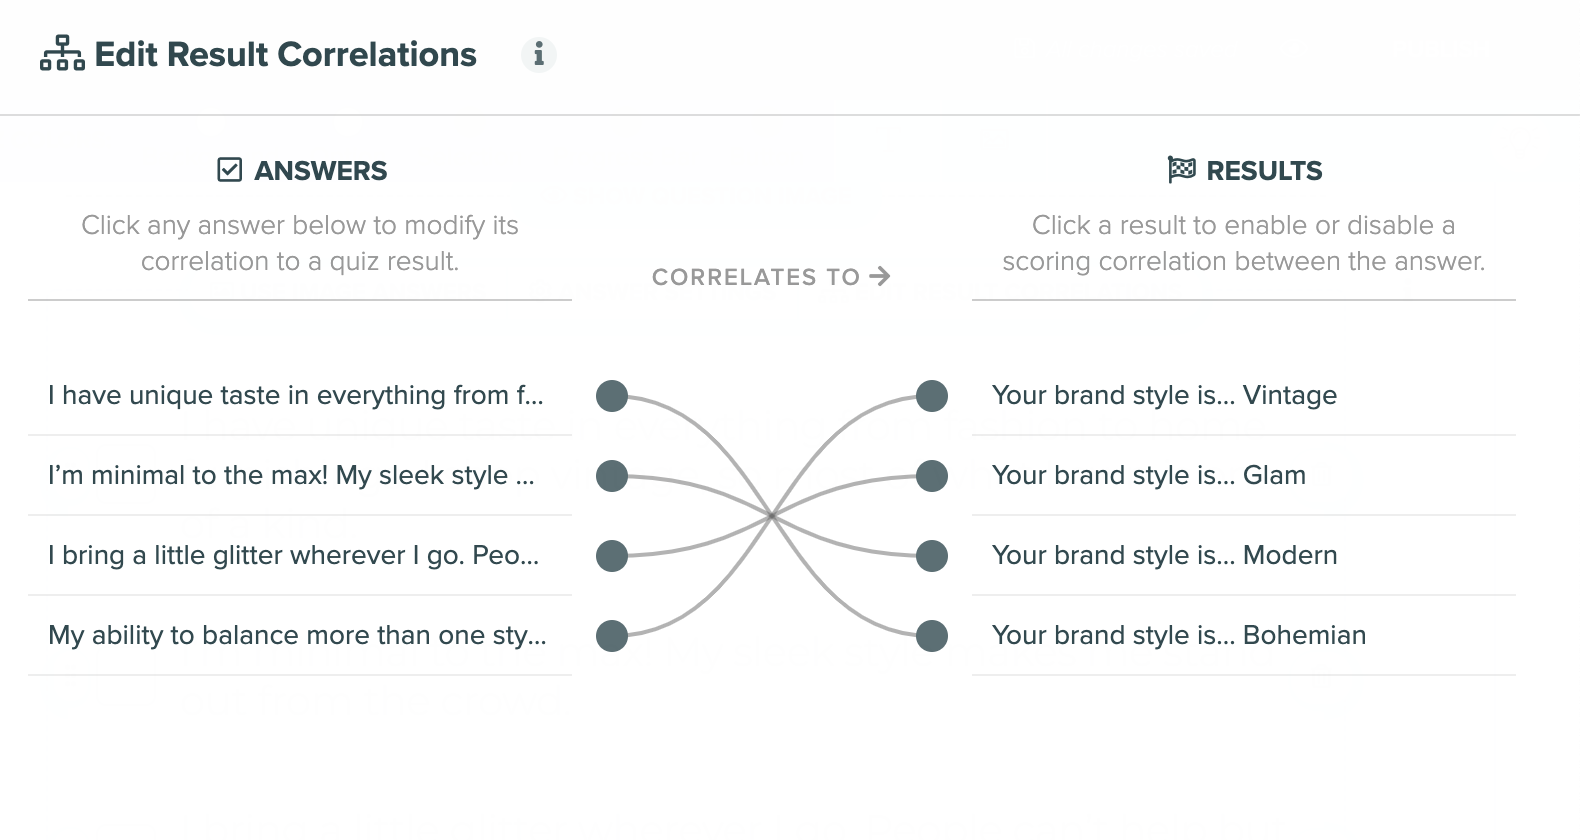
As you plug in your questions, make sure you ‘Edit Results Correlations’.. so that the quiz questions correlate with an outcome that aligns with their answers. It will look like this:
At the end of your quiz, in the Results section, I highly recommend that you include the following:
Their “results”, which should be at least a few sentences, and will vary depending on how they answered the questions (This should be different for each result.)
Some free valuable tips or resources, relative to the quiz content (This can always be the same, for all result outcomes.)
Your headshot, a brief bio introducing yourself and your offerings (This can always be the same, for all result outcomes.)
A call to action for whatever you want them to do next. Mine is a big button that says “Apply for a Free Consultation!” (This can always be the same, for all result outcomes.)
Are you feeling super overwhelmed by this blog post? You can hire me to do all of this stuff for you… click here for more info!
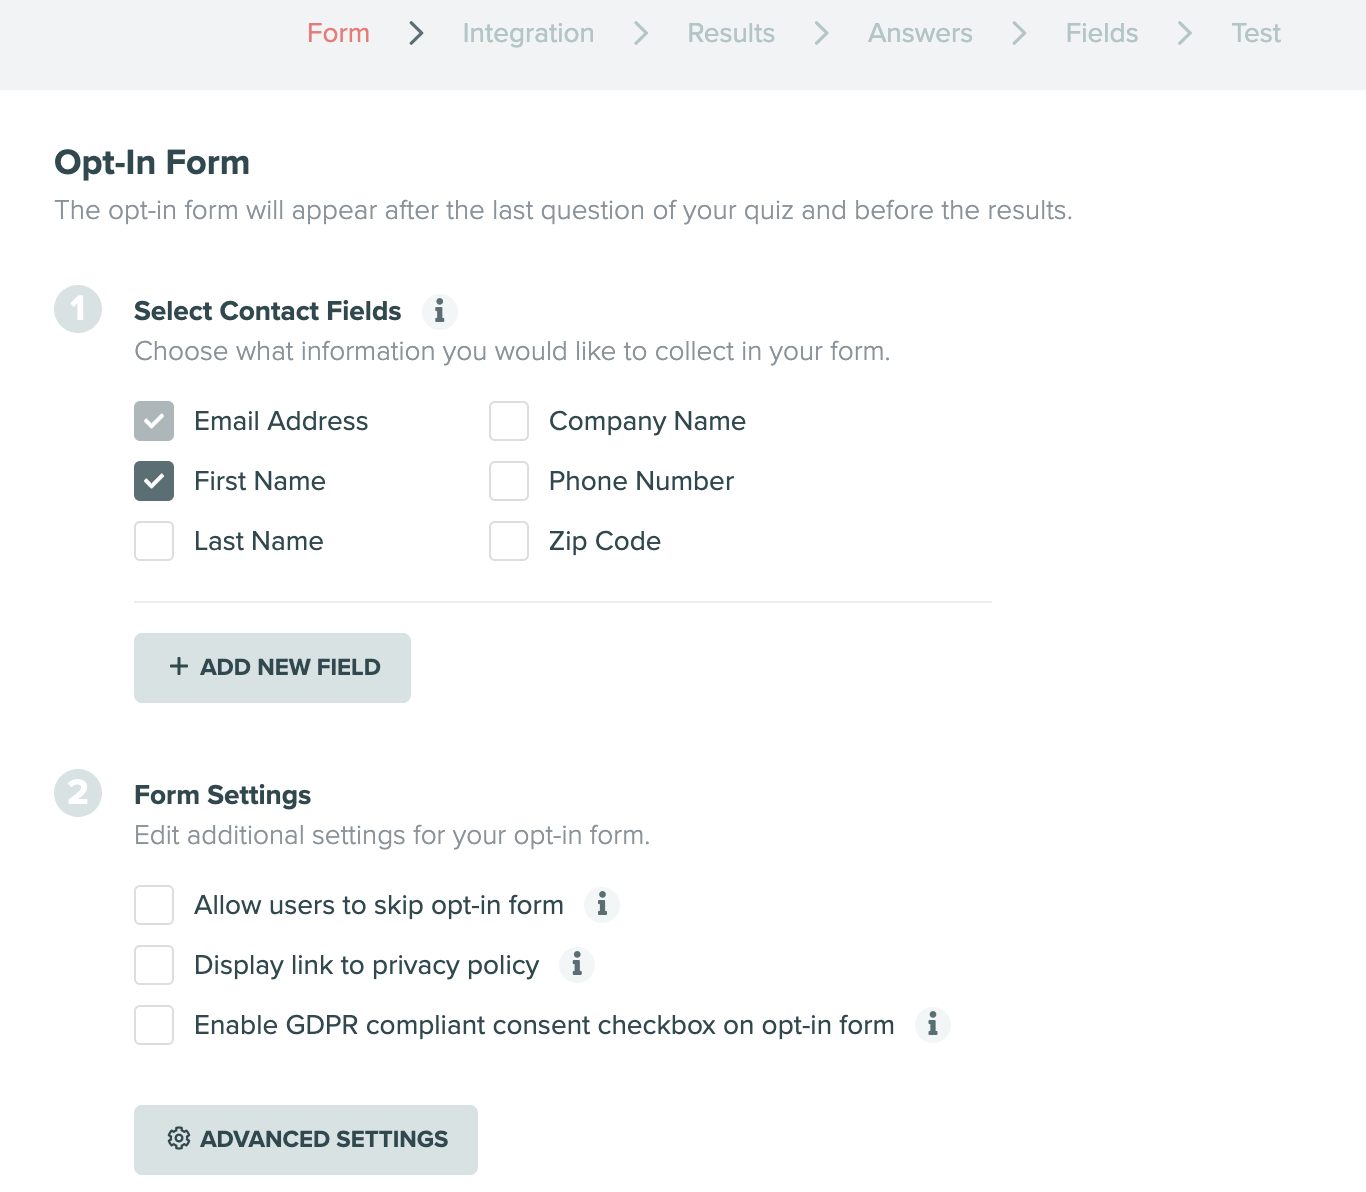
Step 2: Set up Lead Generation (DON’T SKIP THIS!)
This is super important!! Without this step, your quiz won’t be collecting any emails.. which is the whole reason we’re doing this in the first place.
Make sure you switch ‘Lead Generation’ from OFF to ON. This is under the Results section. Make sure you DE-SELECT the box that says ‘Allow Users to Skip Opt-In Form’.
Your settings for Form should look like this:
Next it will ask you to Connect an Integration. For this you can choose your email marketing provider, or choose .csv file download. I highly HIGHLY recommend ConvertKit for email marketing. Sign up with them and then choose this option to make your life so much easier!
Once you have this set up, you can hit PUBLISH in the upper right hand area and your quiz should be good to go. Woo hoo! You’re almost done..
Step 3: Share Your Quiz & Install It on your Website
Use this link to navigate back to the Interact home page dashboard. There you will see your quiz.
On the right side, click on SHARE & EMBED.
A menu will pop up with various options on the left side for sharing your form.
To get a direct link to your quiz, click on the top option which says Share Link. You can use this link to send the quiz via text message or email.
To install your quiz in Squarespace, Click on where it says </> Embed Code, select Javascript, and copy the code in the box.
Next, on your Squarespace site, wherever you would like your quiz to appear, simply add a Code Block and paste the code. The quiz will instantly appear.
Step 4: Add the Contacts to Your Mailing List
If you choose one of the email marketing providers supported by Interact, including ConvertKit which is my recommendation, follow the instructions to connect the two accounts, and this will happen automatically. Do a test quiz just to make sure!
However, if you’re using Squarespace for email marketing, there’s an extra step.
Go back to the Interact homepage dashboard, and click on ANALYTICS for your quiz.
Scroll down and look on the left where it says Recently Collected Leads.
Click on the link that says See All Leads.
On the top right, click on the pink button that says DOWNLOAD LEADS. It will give you some options, then click on CREATE DOWNLOAD FILE.
Download the .CSV file, and then hop back on over to Squarespace.
In Squarespace, from your homepage dashboard, select Marketing (on the left.)
Click on Email Campaigns.
Click on Mailing Lists.
Click on the Mailing List you want to add the new Contacts to.
Navigate all the way over to the top right of the screen. Click on the •••
Click on Import List. Upload the .CSV file you downloaded from Interact, under Confirm Permission, to the right of Marketing, toggle the switch to ON. Click NEXT on the top right.
Your new subscribers will be added to your Squarespace mailing list. YAYYYYYY!!!!!
(Keep in mind, since this isn’t automated, you will need to do this step every so often. I update my Squarespace mailing list with a new .CSV file every time I am about to send a new marketing email, which is every 2 weeks. Hopefully they will add a Squarespace integration soon so that this can be automated instead.)
That’s it! 🥳🥂
Pop some bubbly because you now have a BADASS lead magnet on your website and are on your way to collecting warm leads that are specific to your small business. Congrats.. I’m so proud of you!
I know it may look like a lot of steps, but this is actually very easy to set up especially once you get the hang of it. The Interact Quiz Builder is super intuitive and user-friendly, like I mentioned before.
{Overwhelmed as fuck by all of this? You can hire me to do everything for ya.. click here to learn more!}
My quizzes have been my most valuable lead magnet tool for growing my email list.. my only regret is that I didn’t find Interact and start using it sooner!
Click here to start building a Quiz for your website with Interact today!
If you have any questions, please leave them in the comments section down below and I will answer them within 24 hours. Thanks & enjoy!
x, gretchen


RELATED POSTS


Psst.. are you sick and tired of figuring out what to cook or order for dinner every night?
I was so over it. I tried Blue Apron and Hello Fresh, and I loved the convenience of the meal kits... but they were so expensive, I just couldn’t justify it. Then I found Dinnerly.
Click here to get a free box from Dinnerly - on me!
Dinnerly has allowed me to take the guess-work out of dinner completely, and quit grocery shopping — which felt like a huge waste of my precious time. But what really sold me on this particular brand is the price. I still can’t believe that Dinnerly meals are only $4.99 per person per meal, and they are literally the exact same thing as Blue Apron and Hello Fresh. (I’m talking the same exact chicken with the same packaging from the same vendor.)
I’ve been using the Dinnerly kits to make dinner for myself and Ham 3 nights a week for the last year, since we started living together. So I can vouch for them that the quality is consistent. In addition to being super affordable, they have so much variety and the meals are incredibly tasty. They have options for vegetarians, pescatarians, as well as low-calorie and low-carb. The meals are pretty healthy and balanced too — you know we eat clean and are a very health conscious couple. Plus you can make them a bit healthier depending on what type of oil you cook with, how much butter or ghee you use, and how much salt you use.
You know I don’t recommend any brands or products that I don’t absolutely love, and I recommend Dinnerly to all my friends.
I’m a Brand Designer and Strategist living in NYC. 9 years ago I quit my job to start this business, and now I’m here to help you do it too! I specialize in helping established female millennial entrepreneurs transform their brands.. to attract Dream Clients and grow their businesses, so that they can make more money, be their own bosses and live the life they deserve!